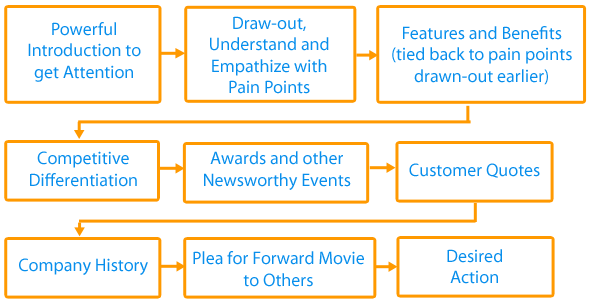
#
SiteHatcher

Web Design and Marketing

Tuesday, January 12 2016
How to Make Your Eblast Mobile Friendly

Want more people to read your eblast? Make your eblast moble friendly.

More email is being read on mobile devices than on desktop email clients.

That's why it's important that your eblasts are mobile friendly. There's an obvious correlation between the readibility of an email and the likelihood of it being read. Make the email easy for users to read and more of them will read and engage with it.  A user shouldn't have to zoom in or scroll. The more a user has to do to read your email, the less likely the user is to read it. Users should be able to read your email comfortably at arms length and click on any links with 1 thumb. Mobile friendly eblasts will also increase your click rate. Follow these simple guidelines to make your eblasts mobile friendly. 

Email marketing bookImplement the steps below to make your eblat mobile friendly. Then get my Email Persuasion by Ian Brodie to learn how ot write emails that are engaging and how to turn your subscribers into paying clients.

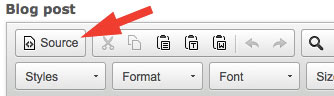
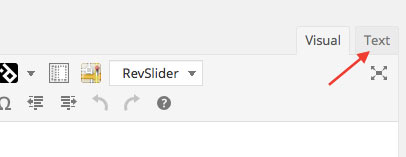
Simple guidelines to make your eblasts mobile friendly

  • Template - use a template that is mobile friendly or responsive design. 
  • Layout - use a single column layout. Use a maximum width of 640 pixels (px). I recommend  a width of 320px which is the portrait width of an iPhone. Some templates with a single column layout may have other design elements on the side that increase the wide of the layout - get rid of those design elements or use a different template.
  • Font - use a font that works well across all platforms; Arial, Verdana, Georgia, Times New Roman.
  • Font size - use a minimum font size of 16 pixel (px) or 14 point (pt) for body copy. Apple recommends 17-22px Google recommends 18-22px. Mail Chimp has found that 16px Georgia works wells. Headlines should be a minimum of 22pt.
  • Calls to Action (CTA) 
    • To get more clicks, place your primary CTA near the top of your message. You'll get fewer clicks if you bury the CTA at the bottom.
    • Have 1 clear, compelling CTA in your eblast.
    • Use large, thumb-tappable buttons.
    • Consider using a click-to-call button. Calling is easier than filling out a form. 
  • Images - Don't assume your images will be viewed on mobile devices. iPhone's native email app will display images by default, but many email clients will block images by default. Many won't load background images at all. When you use an image make sure it's bold and bright with a single focal point. Don't put any important messaging on the image as many users may not see the image. 
  • Content - your content should be clear and concise. It's important to engage users as quickly and efficiently as possible. Limit the amount of copy and use headings, short paragraphs, and bullet points, and short paragraphs. Do not insert any tables. 
  • The goal is to drive traffic to your website and engage users there. When posting to a blog, I recommend that the eblast only contain enough content to compel users to click on a Read More link to the full post on the website. When users are on your website they can; buy products, submit a form, subscribe, watch a video, leave a comment, etc. Remember the Big Idea is to bring traffic to your website. 
  • Provide a plain text version as an option. This is a CAN-SPAM best practice and it's helpful in trying to reach customers with email clients that don't support HTML email. You'll notice that many users will revert to useing the plain text version as well. That should tell you that people prefer a clean, easy to read email. 
  • Test - Send a test email. If possible, check how it displays on different devices; desktop, iphone, android, ipad.
  • Analyze - track your recipients engagement and pay special attention to mobile users. Engaging mobile users is increasingly important. 

If this post was helpful, please share it!


Need help with your email marketing?

Leave a comment or send me an email

Posted by: Craig Ludrick AT 10:08 am   |  Permalink   |  0 Comments  |  Email
Monday, November 16 2015
How to Create the Perfect 3.5 Minute Promotional Video

Promotional videos, when done correctly, can be an effective lead generation tool and a great way to communiccate your value proposition. Your video or animated slide presentation needs to be created so that people actually enjoy viewing it. It should be fast, engaging, and include content that benefits the viewer. 

Video allows you to get your strongest message possible in front of people who wouldn't normally take the time to learn what your company offers or the benefits of your product. They can be produced for lesss than most sales activities and provide a great ROI because they can be used over and over. 

Target Your Messaging

Topics to consider:

  • Who is the intended audience?
  • What do you do? How does it work?
  • What makes your company/product/service so unique, valuable, and special?
  • Describe the competitive
  • Explain how you differ from the competition.
  • Do you want to position yourself against your competitors? By how much and how?
  • What problems do people have without your solutions?
  • Why would someone not want to buy what you're offering?
  • Are there any misconceptions about your company?

RESULT: Your viewers hear an engaging, persuasive and targeted message that educates them and encourages them to learn more.

Tweet: 9 Steps to Create a Powerful Promo Video http://ctt.ec/kTgHq+ #promovideo

Persuasive Message based on a Solution Selling Model with a Compelling Call To Action

9 Steps for The Perfect 3.5 Minute Message

video flowchart

Tips to Get Your Video to Go Viral

  1. Provide quality educational and useful content that benefits the viewer. 
  2. Tell a story! People want stories. That's what all TV, movies, and books are. People are attracted to great stories.
  3. Make it shorter. The first thing people check when they decide to play a video is to see how long it is. 10 minutes: no way. 2 minutes: I'll give it a chance.  
  4. If you want your video to go viral on Facebook don't post YouTube links on Facebook. Upload the video to Facebook. Native Facebook videos get significantly more engagement. Facebook has decided to favor videos uploaded directly to Facebook. 
  5. After you have made a concise, compelling video with a great story, share it with people who would care about what you have to say.
  6. Take control over what social media crawlers grab when your video is shared by including the proper Open Graph tags on your site.
  7. Use the right subject lines and titles. People like "How to" and "Lists" titles so use them. 
  8. Leverage content blockers that forces users to share before they can view content.
  9. Ask users to share. 
  10. Limit social buttons to 2 or 3 and place them within your content.
  11. Make it easy for viewers to share on social media and to forward to others.

RESULT: Increased exposure of the important benefits of your company, product, or service. 

Be Prepared for When Your Video Goes Viral

  1. Know where you want to direct your traffic. Whatever you link it to make sure it is optimized to convert the traffic.
  2. Email capture form.
  3. Make sure people know how to contact you.
  4. Respond quickly to request that come in.

15 Uses for Promotional Videos

Website Home Page
Landing / Squeeze Pages
YouTube
Social Media
Email Marketing
Adwords campaigns
Training & Education
Field Sales Visits
Distributors, Resellers, & Affiliates
Laptop Demos
Kiosks & Monitors
Review sites; Yelp and others
Directories
Press Releases
Banner Advertising

Need a video to effectively promote your business? Contact SiteHatcher for more info.

Posted by: Craig Ludrick AT 08:00 pm   |  Permalink   |  0 Comments  |  Email
Sunday, August 02 2015
How to Resize Images for Your Website

It's important that images are sized correctly before they are uploaded to your website. There are two aspects of an image to be concerned with.

  • Image dimensions -  the height and width are measured in pixels or px for short.
  • Size of the file - measured in bytes, kilobytes (KB) or megabytes (MB)

For an example image I'm going to use this photo I took on a recent trip. You'll notice the file is 2MB. I try to keep images around 50KB on my website depending on what I'm using the image for. So, you can see that 2MB is way too large.  

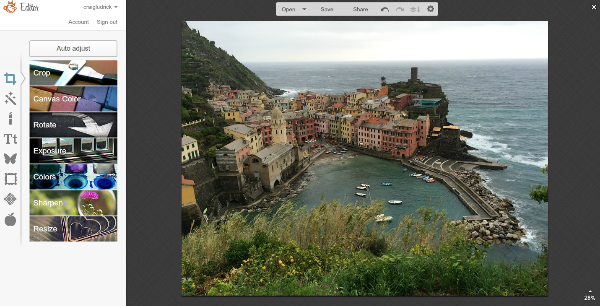
The dimensions are 3264 pixels x 2448 pixels. To give you an idea how big that is, the dimensions of cover photos on Facebook is 851px x 315px. Our sample image is almost 4 times the width of a Facebook cover image.

Usually once we take care of the dimensions, the width and height of an image, that will take care of the file size as well.

I normally use PhotoShop to resize images. I'm assuming that if you have PhotoShop you already know how to resize images. So for this demonstration, I'm going to use PicMonkey a free online tool to show you how to resize images for your website or blog.

The basic editing features are free with PicMonkey. You can upgrade and get access to all of the PicMonkey tools. If you're going to be working with images and you don't have PhotoShop, I recommend you get the paid version. I have PhotoShop and I still use PicMonkey quite a bit because it's so quick and easy to use. 

4 Easy Steps to Resize Your Image for the Internet

Step 1: Go to PicMonkey, click on the Edit icon at the top, then click on Computer under the Edit icon. Then choose the file that you want to resize.

Step 2: Notice in the bottom right corner that the image is displayed at 28% of it's size. It's so large it can't fit on the screen.
Click on Resize at the bottom of the left column.

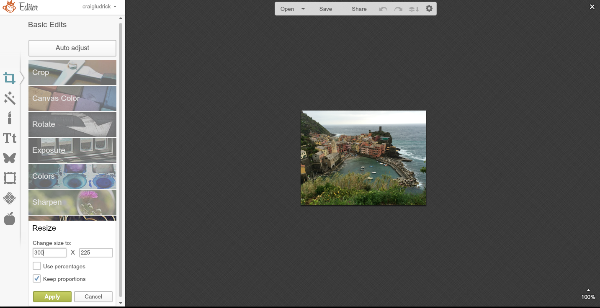
Step 3: Enter in your new pixel dimensions. If your not sure, see my note below to help you get an idea.
Make sure to check the Keep Proportions box. Click on Apply.

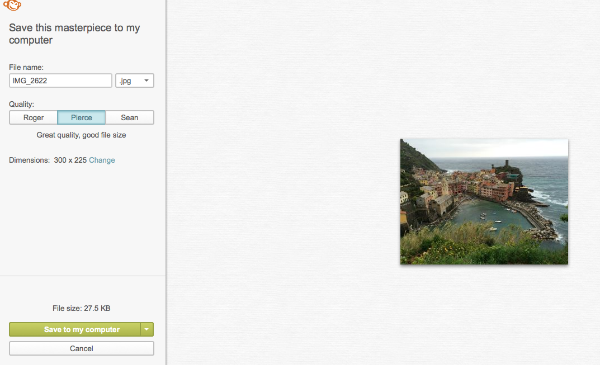
Step 4: In the first box, you can rename your file and select file type. I recommend you save it as a jpg.
Under Quality, I recommend you select the middle button. That tends to give adequate quality and file size.
Notice the dimensions are now 300px x 225px and then at the bottom, you'll see the file size is only 27KB.
Click on Save to my computer. Now you're ready to upload the new file to your site.

What if I'm not sure what pixel size my image needs to be?

If you're new to working with pixels here are 2 ways to find out the dimensions of an image on a website. By looking at the size of images already on a website you'll get an idea for what size your image needs to be.

  1. In Firefox, right cick on an image or put 2 fingers on your trackpad when you click it. That will bring up a menu list. Select View Image Info. Look down and you'll see Dimensions.
  2. MeasureIt is a helpful FireFox Add-on you can install that allows you to move your cursor on the screen to determine the size of any image or space that you are viewing. I use this frequently. Chrome has a similar Add-on called PageRuler.

Posted by: Craig Ludrick AT 06:10 pm   |  Permalink   |  0 Comments  |  Email
Saturday, July 18 2015
How To Put A Video on Your Website or Blog
 

There are multiple benefits to adding videos to your website.

A few these benefits include:

  • Videos on your site will help your pages to get higher rankings with Google.
    • To get the full SEO benefit your YouTube account should be integrated with your Google My Business account. Contact me if you need help setting that up.
  • Video on your site will increase traffic to your site from additional sources
  • Videos are "sticky". Users engage and stay on your site longer. Increased engagement also helps with SEO.
  • Video is very shareable which will expand your reach.

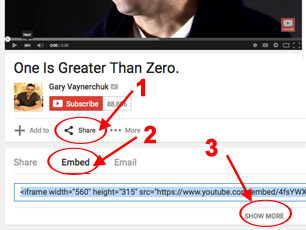
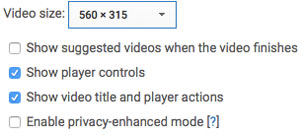
For a sample video to embed, I'm going to use one of  Gary Vaynerchuk's YouTube videos. Keep in mind, you will get much more benefit from creating and uploading your own videos. When you upload your own videos to YouTube, you will need to optimize them. I'll go over that in another blog post.

How to embed a video
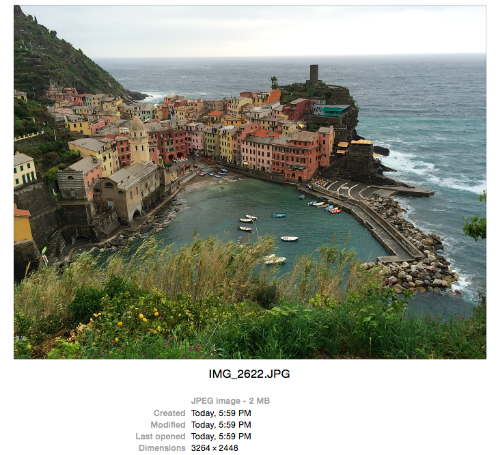
how to embed video

  1. Click on the Share button under the video.

  2. Click the Embed link.

  3. Click the Show More link.

    • Select the video size

    • I recommend that you check the box to enable player controls and show  video title and player actions. Do not check the box for show related videos. (There's no telling what could be shown)

  4. Copy the provided code.

  5. Paste the code on your blog or website. See specific instructions for SiteHatcher and WordPress.

How to paste the embed code on a SiteHatcher website

(If you're adding video to your blog page skip to instructions below)

  1. Add a component by clicking on the + sign
  2. Click Standard/HTML in right column
    (1 in image)
  3. Click on the HTML component
    (2 in image)
  4. Paste the embed code inside the html component.  

Note: You can also click on the Audio/Video in the right column, select the YouTube component and then paste in either the YouTube link or the embed code. Using the HTML is 1 less click and you can also paste in the embed code from Vimeo, Ustream, and others as well as YouTube.

Adding video to your blog

  1. Click on the Source button in the edit bar.
  2. Paste the embed code.
  3. Click button to Apply Changes.

How to paste te embed code on a WordPress website

  1. On the edit bar click on Text - see image.
  2. Paste the embed code.
  3. Click the Update button.

How to set your video to Autoplay

I don't normally recommend setting videos to autoplay, but here is the

  1. Paste the code
  2. Add &autoplay=1" after ?rel=0
  3. Be sure to put the " after the 1.

Example

  • Before adding autoplay <iframe width="560" height="315" src="https://www.youtube.com/embed/4fsYWXrGGcE?rel=0" frameborder="0" allowfullscreen></iframe>
  • After adding code for autoplay <iframe width="560" height="315" src="https://www.youtube.com/embed/4fsYWXrGGcE?rel=0&autoplay=1" frameborder="0" allowfullscreen></iframe>

Was this helpful? If so, share it!

Bonus!

For your inspiration, I embedded the code from above that I used as a demo. Watch Gary Vaynerchuk's 2 minute video below for inspiration to help you to be consistent in posting to you blog and adding videos as well.

Posted by: Craig AT 12:19 pm   |  Permalink   |  0 Comments  |  Email
Let me know if the content was helpful by sharing it!
Email
Twitter
Facebook
Digg
LinkedIn
Delicious
StumbleUpon
Add to favorites
    CONTACT
    SiteHatcher
    8000 Research Forest Dr
    Suite 115, #280
    The Woodlands, TX 77382
    CONNECT
    rss feedour facebook page linkdin
    SiteHatcher
    SiteHatcher creates websites that get results by integrating Search Engine Marketing, Social Media Marketing, and Email marketing. Good design get's results.